Hope you enjoyed the last several days of kicking off the Holiday Catalog! Today we continue on a few more. This time, though, most of the action will be taking place over in Blogville! I will post some of my work on my Insta and Facebook (and always on my favorite Pinterest) – but you can see the works of some other international demonstrators as we focus on products from the Holiday Catalog.
If you have never been part of a Blog Hop before – it’s a super simple concept. You look at all my pretties….then I have the next link that you click off to – you look at hers – she has the next – and you keep clicking til you are right back here and you know you have come full circle!
So – here we go!
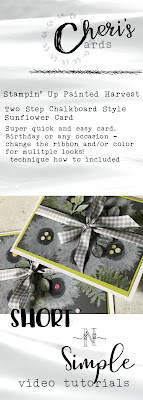
Those of you who were here yesterday saw several samples with the same stamp set we are featuring today (so if you weren’t here yesterday – I HIGHLY recommend you hit that HOME link at the top so you can go back and see them!). Here is one more fun take on the Painted Harvest stamp set…..
(Just a word on my videos for you new hoppers – they are fast! I have designed them specifically to fit into lives of ladies like me. Have 3 minutes to sneak in the bathroom at work on break? Have 5 minutes while your daughter wanders out from golf practice? Have 2 minutes while the kids don’t know where you are and you need to be super stealth? Can’t sleep but your hubby is snoring next to you? My videos have music – but you don’t have to have it up – and hang on, they go fast! It’s very rare they are over 4 minutes!
Sometimes our “inspiration” comes from random places. This card was inspired by sheer laziness! I needed to create a card to participate in this hop. Unfortunately in a quest to be prepared – all of my projects for my upcoming camp were already prepared. When I do my camps I put everything for each project in a bucket. So the stamps that I was using for THIS card were in the bucket with the ink pads for this project. I didn’t want to take it all apart and have to remember what to put back into the buckets…..
So I decided to just switch up the background color and eliminate the tag. My first design through I used just the Olive Enamel Dots – but it looked dangerously close to being a Christmas card! That was not my intent. I think if you were making the card in the Spring it would be fine, but right now in the craft world we are getting a bit of the Christmas bug.
When I filmed the second card I just went for random colors and I liked that look a lot. It’s a happy card – the gingham most certainly adds to that! So – when you put this stamp set away in the winter, don’t forget to bring it back out next March as we get ready for Spring!
Unless you are an Aussie!! Then it’s the ideal way to turn this set that we have been stamping in our hues of Autumn as you start to celebrate the warming temperatures and longer days of sunshine!
To continue on the blog hop to see the next stop – you will be going to visit Beachside Stampers – just click HERE
If you started from me – make sure you get all the way to Christy (she is actually a friend of mine!)- she is the end of the circle before me!
If you are going to pin any of my cards (I will love it if you do!) I would ask that one of them be this one -please and thanks!!!
Finally -to make my Painted Harvest Card – here are some of the supplies that you would need. Because there are international demonstrators involved in this Blog Hop – please Note that this is a list for US products. If you live in the US, you are always welcome to shop at my site!
Product List


OOOH that gingham ribbon is just perfect with this fun color combination. I love that the images are stamped on a non white/vanilla background.
I love the technique of stamping the flowers in white first, and then using color on top! Your card is gorgeous, Cheri!
Love how the leaves came out. I must get around to using the leaf punch – you've inspired me!
The white is pretty on several colors of the cardstock. I did find that when I was stamping the color over for the second step, you get a much stronger color if you heat set it first. I would like to skip the step because…you know… a little lazy! but it makes the second color pop much better!